 |
| Screenshot from Rogue One, © Lucasfilm Ltd. |
A friend of mine (who has already
bought numerous pieces from me) asked me to build him General Antoc Merrick's Blue One X-wing from
Rogue One. Since he was an awesome character with a killer mustache, I immediately accepted! After the break, I'll dive into my progress on the build.
After doing some looking around on the internet for reference photos of the Blue Leader digital model, it became apparent that Bandai used Blue Leader as the basis of their
"Red Squadron X-wing" dual set released in conjunction with Rogue One, except with the colors swapped to red. This was good for me because I already had this kit on hand
and I was looking forward to building it because of the updated decal sheet filled with tiny markings and symbols. After pouring over dozens of screenshots on
Starwarsscreencaps.com, I was able to pretty much pin down all the little nuances of Blue Leader's X-wing, of which there are a few to differentiate him from his squad mates.
Like usual, I started with the pilot and cockpit. After priming everything black Badger Stynylrez primer, which has quickly become my new favorite primer, I sprayed everything with Tamiya Dark Grey (XF-24) before adding some chipping with Vallejo Model Air Steel and picking out some details in various Vallejo greys. The seat was painted Tamiya NATO Black (XF-69) and the padding was painted with Vallejo Game Color Beasty Brown.
I painted General Antoc Merrick's flight suit with Tamiya Medium Blue (XF-18) and picked the details out with various Vallejo acrylics. I actually made a mistake on him because I missed the cream-colored strikes running down the sleeves of his flight suit, but I didn't realize it until I had already placed him in the cockpit.
While I was working on the General, I decided to paint his droid. Based on what I could find, his unnamed droid had a red body and a dome that resembled R2-D2. Since the dual kit doesn't come with a full droid body, I scrounged one from my spare parts box and painted it Tamiya Flat Red (XF-7) and painted the dome Alclad Aluminum and applied some spare R2-D2 decals I had laying around. I hand-painted some details on the body and gave it a wash with Mig Dark Wash enamel to bring out the details (not that they can be seen once he secured in his droid socket).

After masking the canopy, I set to priming all of the sub-assemblies, again using Badger Stynylrez primer. For this build, I decided to try Mr Paint Insignia White for the base color. This is a relatively new paint company from Slovakia that specialize in aircraft modeling paint and they have already built a nice reputation for themselves. MRP is a lacquer airbrush-ready paint that sprayed quite nicely out of my Badger SOTAR 20/20 airbrush and works especially well with the
black-basing technique.
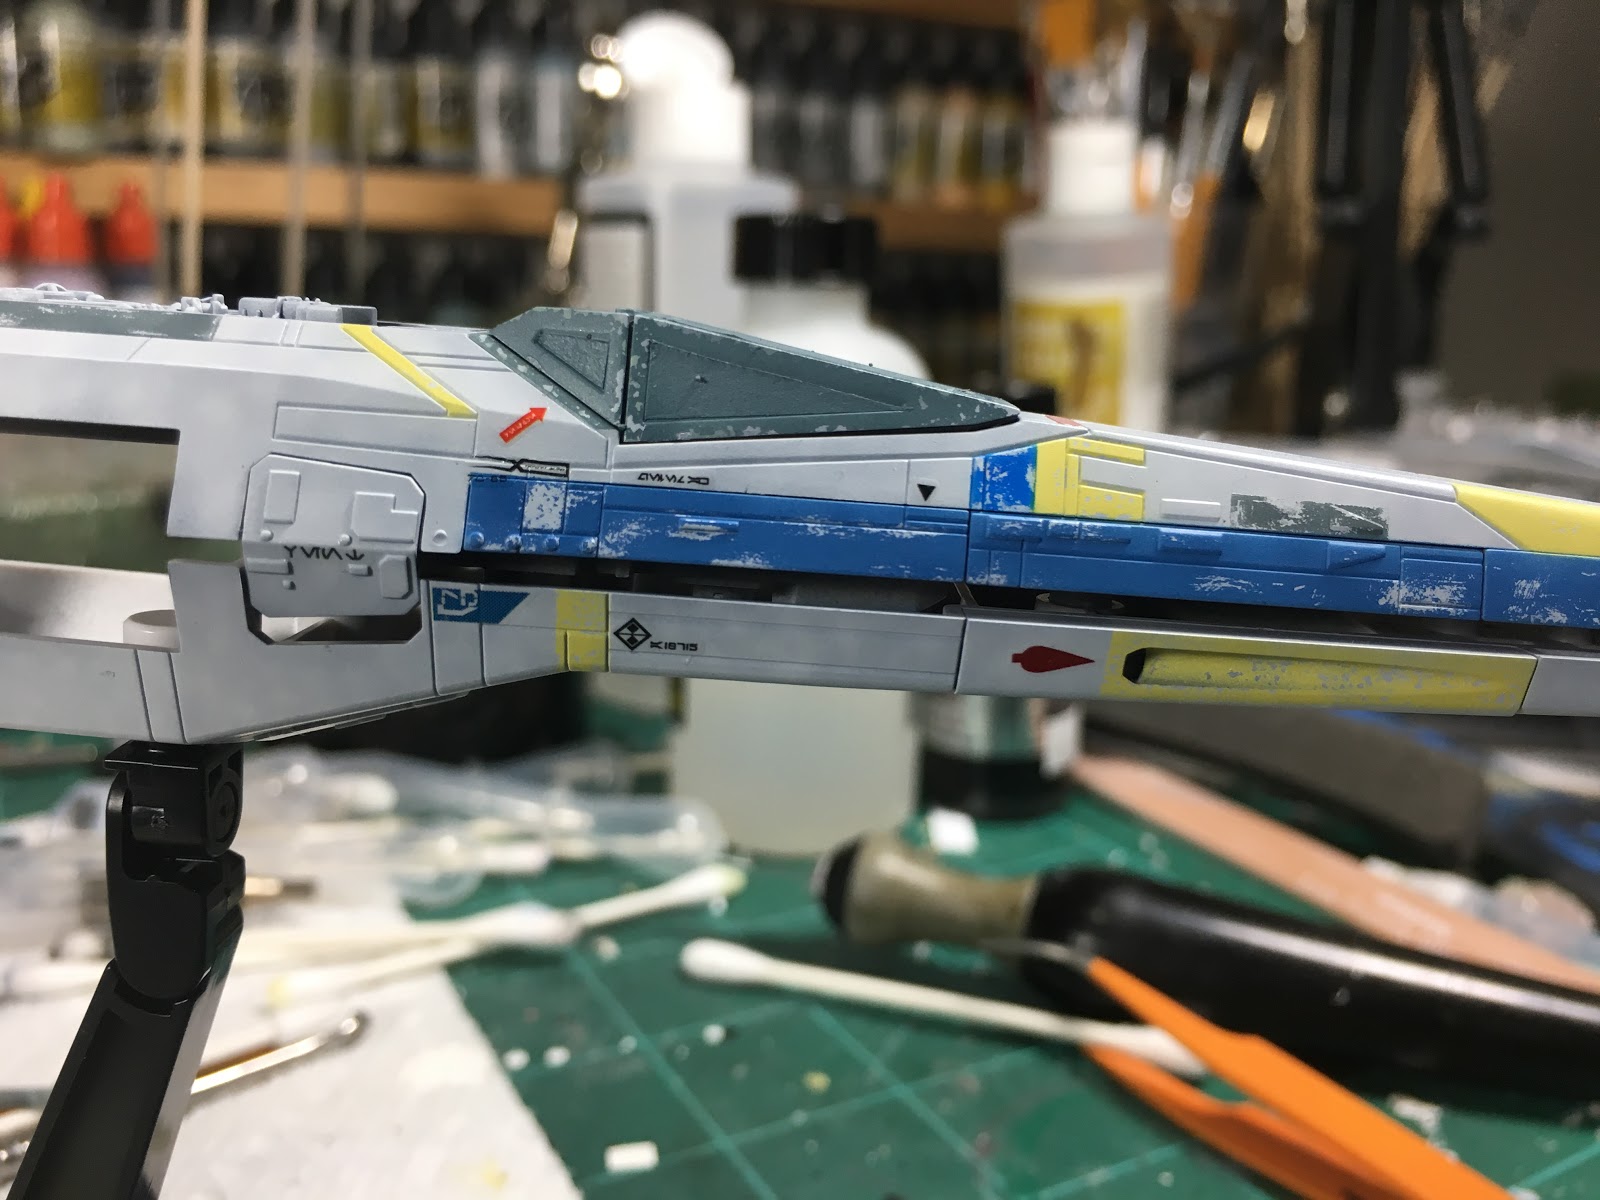
After getting the base coat down, I start masking off panels, which is actually one of my favorite parts about painting X-wings. Unlike Luke's Red Five, Blue Leader doesn't have much variation when it comes to panel colors; they're all pretty much dark blue, pale yellow, and grey. Regardless, when taken together, they give the ship the beaten patchwork look that so many of us are familiar with. Given that there are more yellow panels than any other color, I decided to start with those. Normally, I use liquid mask applied with a piece of torn foam, but I want to try something different with this build and decided to use chipping fluid. However, I found that the chipping fluid tended to bead up on the gloss MRP finish and the outcome was not what I was looking for.


I decided against stripping and repainting it, instead choosing to apply a thin coat of matte varnish to the panels I need to mask. In the end, I think this was the better way to go because as unhappy as I was with how the yellow turned out, I
really didn't want to strip the damn thing and start over. I pressed on with painting and chipping all of the panels and squadron markings. Once that was complete, I gave everything a coat of Tamiya Clear Gloss (X-22), which has become my new go-to for prepping a model for decals...
...and decals aplenty there was! All told, I applied sixty-four decals across the entire model. Thought it was a lot of work, it was definitely worth it since they add a lot of character to the model.
 |
| I hadn't yet added the grey and orange panel on the blue stripe. |
Now that the decals are on, they can be sealed with more X-22 in preparation for washes and further weathering.


Fascinated as always with your work-in-progress posts. And wow! 64 decals is a lot.
ReplyDeleteI really appreciate the kind of topics you post here. Thanks for sharing us a great information that is actually helpful. Good day! return address lables
ReplyDelete